prints on paper:
working with standard sizes
[when your images are not...]
Borders are provided to facilitate handling, matting and framing of the print. They also provide
a useful way to standardize your print sizes by accommodating images of different proportions, and standard sizes will streamline the marketing and selling of your prints...
a useful way to standardize your print sizes by accommodating images of different proportions, and standard sizes will streamline the marketing and selling of your prints...
why standard sizes?
Traditionally, when presenting a body of work as a suite of fine art prints (and they could be etchings, silkscreen prints, or your digital prints, it makes no difference) either in a portfolio or in frames in an exhibition, it looks more professional and effective when the 'outside' sizes are all the same or at least a limited range of sizes. In turn this simplifies your pricing structure.
However this does not restrict your creativity, there need be no consistency in the the composition and cropping that you choose for the images, which are 'floated' inside the sheet of paper.
However this does not restrict your creativity, there need be no consistency in the the composition and cropping that you choose for the images, which are 'floated' inside the sheet of paper.
placing images within 'STANDARD' PAPER SIZES
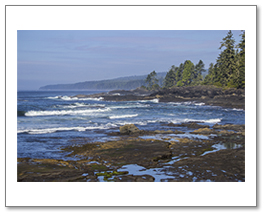
When printing to standard paper/frame sizes, the proportions of the photograph do not always match that of the paper so you have to make a choice, either you crop the image to make it fit the paper with equal borders ("size for the paper") which will most likely compromise the image, or accept, as shown here, different border sizes top and bottom to those right and left ("size for the image").
|
Above: 20"x 13.3" image (3:2) placed in a 24"x20" sheet of paper (6:5)
for standard exhibition frame or portfolio sleeve. |
A common example is when 35mm photographs, usually in the ratio of 3:2 or 4:3, are to be printed on 10x8 paper with a ratio of 5:4, as shown below with a half inch border at the sides.
Courtesy: Mary Weir, BC
Courtesy: Christina Stobbs, BC
|
step by step guide to how we do it
[creating the example, above left, in photoshop]
- When sending image files to us for printing please send us the image file prior to the steps detailed here.
- This is what we do as part of the service; all you need to provide is the image and tell us the chosen paper size and the minimum border size you require.
- The following is provided to help you to quickly and easily visualize your print sizes and price your prints for sale on your website etc.
|
1] Create the Full Size 'Blank Sheet'
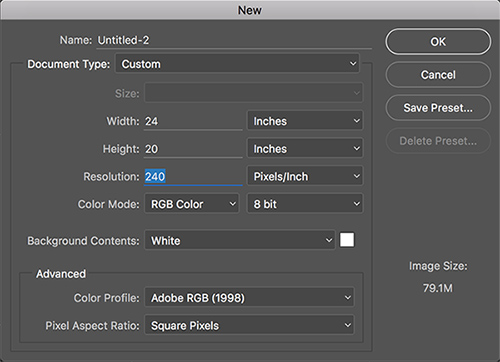
Menu: File/New will open this dialog box (right )
Width and Height: Set to the full sheet size. Resolution: Desired printing resolution. If sending a file to us choose 240 dpi or 360 dpi for Epson printers. (300 dpi for Canon.) Color Mode: RGB Color / 8 bit (for printing). Background Contents: White (no brainer). Color Profile: Choose Adobe RGB (1998) which is the colour space that you should be using in the camera. Pixel Aspect Ratio: Leave as Square Pixels (default). |
2] Size the Image
|
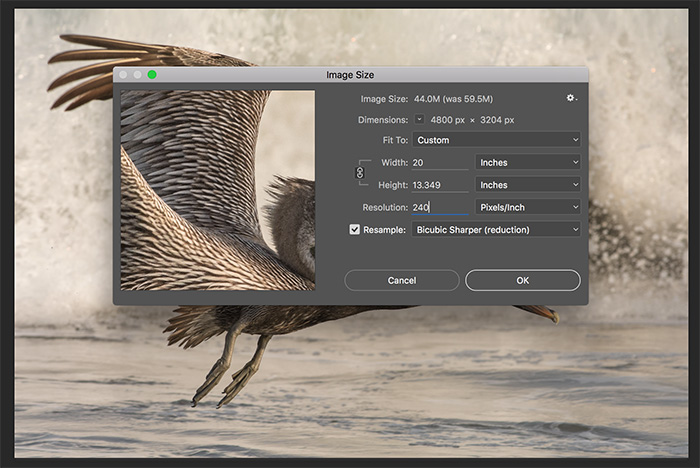
Image Size: For Info purposes, note that in this case the new image size is smaller than the original size, which determines the Resample method (below).
Width and Height: Set the width to 4" less than the full sheet size to give a 2" border at the sides and 'let the height take care of itself' Resolution: Desired printing resolution, it must be the same as that chosen for the blank sheet. Resample: When downsizing an image there's only one option (as shown), When enlarging there are 5 options but most times "Bicubic Smoother (enlargement) " works best. |
3] Sharpen/Reduce Noise
4] If the image is 16-bit change it to 8-bit: At this stage manipulations/adjustments are finished so change to printing resolution
5] 'Select All ' and 'Copy '
6] Open the Blank Sheet and 'Paste ':
4] If the image is 16-bit change it to 8-bit: At this stage manipulations/adjustments are finished so change to printing resolution
5] 'Select All ' and 'Copy '
6] Open the Blank Sheet and 'Paste ':
|
|
7] Flatten the layers
8] 'Save as' a Tiff file, and it's 'Print Ready'!
8] 'Save as' a Tiff file, and it's 'Print Ready'!
placing 'extreme' non-standard images on 24"x 20" PAPER
|
"Toronto Skyline": Rob Greatrix, ON
|
Left: Panorama, Ratio 1:2
Right: Square, Ratio 1:1
|

"Glacier 1"; Stacey Bodnaruk, BC
|
RELATED ARTICLES
- Calibrating Screen Resolution to Determine "Print Size" in Adobe Photoshop [Video Tutorial 6:10]
- Processing RAW Files: Removing Noise & Vignetting in Adobe Camera Raw [Video Tutorial 20:57]
- Saving RAW Files [without losing quality] [Illustrated Tutorial]
- Photographing Artwork with 35mm Cameras: A Few Basic Guidelines [Tutorial]
- Monitor Calibration For Accurately Viewing Images [Illustrated Tutorial]
- Guidelines: Uploading Image Files for Printing
- About Digital (Giclée) Fine Art Printing
- Traditional Conservation / Archival Framing (Behind Glass)


